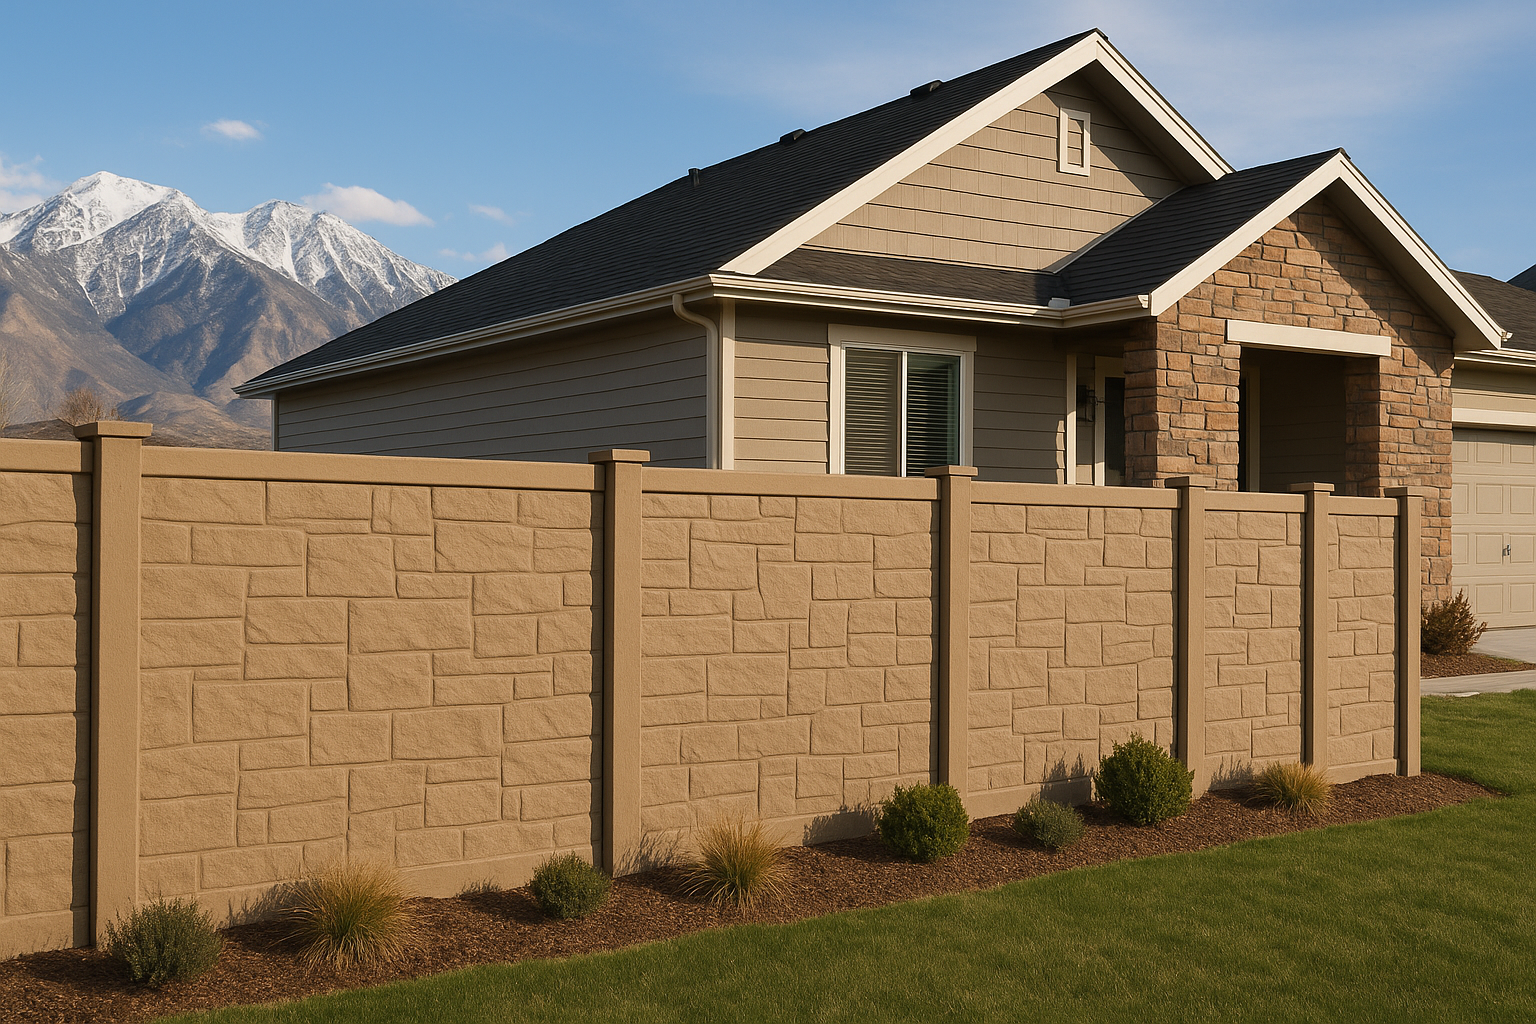
If you’ve lived in Utah for more than a single winter, you know that our weather can be downright brutal on your property’s exterior. You want a fence that looks like an ancient stone wall but can handle the freeze-thaw cycle of the Wasatch Front without crumbling, which is exactly why you’re looking at Simtek. Let’s walk through how to get this premium fencing installed without losing your mind in the process.
Why Is Everyone Talking About SimTek Anyway?
You might be wondering if the hype is real. Honestly, it is. SimTek (which you might also see branded under Barrette Outdoor Living these days) is made of a proprietary linear low-density polyethylene (LLDPE) blend. That’s a fancy way of saying it’s incredibly tough plastic that looks startlingly like real rock or Wood.
Here’s the thing: most people in Salt Lake or Davis County pick it for sound isolation. If you live near a busy road—say, Bangerter Highway or I-15—this stuff is a lifesaver. It cuts down noise better than wood or standard Vinyl ever could. Plus, it’s practically immune to golf balls, baseballs, and the occasional rock kicked up by a lawnmower.
But, getting it from the factory to standing upright in your backyard? That requires a bit more finesse than your average weekend DIY project.
Tip #1: Don’t Skip the “Boring” Paperwork
I know, nobody likes red tape. We’d all rather just grab a shovel and start digging. But in Utah, skipping the prep work is the fastest way to turn a weekend project into a legal nightmare.
Before you even order a single panel, you need to check your property lines. I can’t tell you how many times we’ve seen homeowners guess where their property ends, only to find out they built three feet onto their neighbor’s land. Get a survey. It’s cheaper than tearing down a fence.
And then there is the HOA. If you live in a planned community in Lehi or South Jordan, your HOA likely has strict guidelines on fence height and color. SimTek usually comes in colors like Brown Granite, Beige Granite, and Dark Brown. You might love the Dark Brown, but if your HOA demands beige, you’re going to have a bad time.
Permits matter too. Most cities in Utah County and Salt Lake County require a permit for fences over six feet tall (and sometimes even six feet, depending on the zone). Since SimTek is heavy and acts like a solid wall, the city wants to make sure it isn’t going to blow over on someone.
Tip #2: Respect the “Sail Effect”
Let’s talk about wind. If you live in Farmington or near the Point of the Mountain, you know what happens when the canyon winds pick up. We are talking gusts that can tip semi-trucks.
SimTek creates a solid barrier. It doesn’t have gaps like a picket fence or Chain link to let air pass through. In the fencing industry, we call this a “sail.” When a 60-mph gust hits a solid 6-foot fence, the amount of force transferred to the posts is massive.
The Solution? Deep Footings.
You cannot skimp on the Concrete here. For a standard Vinyl Fence, you might get away with a shallower hole, but for SimTek in windy Utah zones, we need to go deep. We are talking 30 inches minimum, sometimes deeper depending on the frost line and local code.
You also need to use the steel stiffeners inside the posts. SimTek posts are hollow polyethylene, but they are designed to slide over a heavy-duty steel pipe (usually galvanized) that is anchored in the concrete. Without that steel gut, your fence is just a plastic decoration waiting to snap.
Tip #3: Temperature Tantrums (Thermal Expansion)
This is the number one mistake rookie installers make. Polyethylene is a plastic. Plastics expand when they get hot and contract when they get cold. In Utah, we have temperature swings of 100 degrees between summer and winter.
If you install your fence in the middle of July when it’s 95 degrees out, the panels are fully expanded. If you jam them tight against the posts, everything is fine… until December. When the temperature drops to 15 degrees, that plastic shrinks. If you didn’t account for this, you might end up with gaps where the panel pulls out of the post channel.
Conversely, if you install in January, the panels are shrunk. If you install them with zero wiggle room, come August, that fence is going to buckle and warp because it has nowhere to grow.
The Pro Move:
You have to leave a gap for expansion. The manufacturer provides a temperature chart. Follow it religiously. It usually involves leaving about a half-inch to an inch of play within the track depending on the ambient temperature during Installation. It feels counterintuitive to leave things “loose,” but it’s necessary for the fence to breathe.
Tip #4: Handling Slopes and Hills
Utah isn’t exactly flat. Whether you are on the East Bench in Sandy or the foothills of Draper, you are probably dealing with a slope.
SimTek is a panel system. Unlike wood, which you can build “rack” to follow the contour of the ground smoothly, SimTek panels are square. You generally cannot rack them. This means you have to step the fence.
Imagine a staircase. That is what your fence line will look like.
- Pros of Stepping: It looks regal and structured.
- Cons: It leaves a triangular gap at the bottom of the fence on the downhill side.
If you have small dogs (or adventurous toddlers), those gaps at the bottom of the steps can be escape routes. You might need to plan for fill dirt, retaining blocks, or a custom modification to close those gaps. It’s better to figure this out before the fence is up than to try and pile rocks there afterward.
Comparison: SimTek vs. The Rest
Sometimes it helps to see why we are going through all this trouble. Here is a quick breakdown of how the installation compares to other common materials we see around the valley.
| Feature | SimTek (EcoStone) | Vinyl | Cedar / Wood |
|---|---|---|---|
| Weight per Panel | Heavy (requires two people) | Light | Moderate |
| Wind Resistance | High (if reinforced with steel) | Moderate | Low to Moderate |
| Installation Speed | Slower (precision needed) | Fast | Moderate |
| Digging Requirement | Deep & Wide (for steel posts) | Standard | Standard |
| Forgiveness | Low (Must get spacing right) | High | High |
Tip #5: Graffiti and Cleaning (Future-Proofing)
One of the coolest things about SimTek that rarely gets mentioned during the install phase is its resistance to graffiti. I know, we don’t like to think about vandalism, but it happens.
Because SimTek is made of polyethylene, paint doesn’t stick to it very well. Most graffiti can be removed with a high-powered pressure washer or a simple citrus-based cleaner.
Why does this matter for installation?
Because you don’t need to worry about sealing it. With a cedar fence, as soon as you install it, you’re on the clock to get it stained before the sun turns it gray. With SimTek, once the last cap is on the post, you are done. There is no “Phase 2” of staining or sealing.
Tip #6: The Gate Hardware Dilemma
Gates are always the weak point of any fence. They move, they slam, and kids hang on them. SimTek gates are heavy. They are solid slabs of material.
You cannot use cheap hinges from the big-box store. You need heavy-duty, stainless steel, adjustable hinges. The “adjustable” part is key. Over time, the ground might settle slightly, or the weight of the gate might cause a tiny bit of sag. Adjustable hinges let you turn a screw and bring the gate back into perfect alignment without re-drilling holes.
Also, ensure the gate post (the one holding the hinges) has an extra-beefy steel stiffener and perhaps even a deeper concrete footing. That post takes a beating every time you open the latch.
Tip #7: Dealing with Utah’s Rocky Soil
We call it the “Rocky Mountains” for a reason. In some parts of Herriman or Alpine, you stick a shovel in the ground and hit a boulder the size of a Volkswagen.
SimTek requires precise post spacing. If the panel is 6 feet wide, the posts must be exactly spaced to accommodate it. You can’t just shift a post three inches to the left to avoid a rock like you can with a Wood Fence.
What do you do when you hit a rock?
Honestly? You keep digging. You bring in a jackhammer, or a rock bar, or sometimes you have to bring in a bigger auger. This is where DIYers usually throw in the towel. If the spacing is off by even an inch, the panel won’t fit, or it will fall out of the track. Precision is non-negotiable here.
Is It Worth the Hassle?
You might be reading this thinking, “Wow, this sounds like a lot of work.” And you know what? It is. Installing a Simtek Fence properly is technically demanding. It requires understanding thermal dynamics, structural wind loads, and precise measurements.
But the result? You get a fence that looks like a castle wall. It blocks out the neighbor’s barking dog, it doesn’t rot, it doesn’t need painting, and it withstands our crazy canyon winds. It adds legitimate value to your home and curb appeal that vinyl just can’t match.
However, because the materials are premium, you can’t afford to mess up the installation. Ruining a cedar board costs you $10. Ruining a SimTek panel is a much more expensive mistake.
Let Us Handle the Heavy Lifting
If the idea of jackhammering through rocky soil or calculating thermal expansion coefficients doesn’t sound like your idea of a fun Saturday, we get it. At Utah Fencing Company, we’ve installed miles of this stuff across the valley. We know the soil, we know the wind, and we know how to make your fence look incredible for decades.
Don’t risk your investment on a guesswork installation. Let’s get it done right the first time.
Ready to upgrade your property?
Give us a call at 801-905-8153
or
Request a Free Quote
Let’s build something that lasts.


